Overview
The purpose of this guide is to configure Amazon AWS Load Balancer with 2 nodes (instance) and configure HTTPS Listener for Elastic Load Balancer (ELB).We will install and configure OpenSSL Certificate that’s is self-signed certificate and we would be configuring “RSA”based chippers.
OpenSSL Certificate may be configured for testing environments. OpenSSL (SelfSigned) certificate(s) should not be installed / configured for production environments.
To secure the environment, we will create a security group for ELB.
The main purpose of load balancer is provide high availability.
Applies To
- Amazon EC2 Instance
- Windows 2012 Server
- Security Group for communication between ELB and application instances
Pre-requisites
- A minimum of 2 EC2 instances have to be running in order to configure ELB.
- Common Name (ServerName)
- OpenSSL files
- Private key file in pem encoded format
- Public key certificate file in pem encoded format
- A http listener is already configured and working
Create – SSL Certificate
There is 3 step process to generate a SSL certificate.- Generate RSA Key File.
- Create CSR (Certificate Signing Request) file.
- Create SSL Certificate.
Create RSA Key File
First and foremost thing is the generate SSL certificate, is to generate RSA based chipper key generation, to generate the pem encoded format RSA key file with 2048 encryption bits, run the command; for easier identification we will name the file prefixing it as “-key” for the output file.openssl genrsa -out reservopia-key.pem 2048

Create a CSR Key File
Next step is to create the CSR (Certificate signing Request) file which is also pem encoded format CSR file with the encryption algorithm to create CSR file, run the command; for easier identification we will name the file prefixing it as“csr” for the output file.Also you need to pass the RSA key file that was generated in the earlier step.
We will not set challenge password for the certificate.
openssl req -sha256 -new -key reservopia-key.pem -out reservopiacsr.pem

Create Certificate
Finally, we will create the certificate in a pem encoded format; for easier identification of the file we will name the file prefixing “-certificate” for the output file. You would also need to pass the “csr” and “-key” files for creating the certificate.| ARGUMENT | PARAMETER VALUE | COMMENTS |
|---|---|---|
| X509 | NA | Self Signed Certificate |
| -days | 365 | Certificate Validity in Days |
| -in | reservopiacsr.pem | Input Certificate Sign Request |
| -signkey | reservopia-key.pem | RSA key File |
| -out | reservopia-certificate.pem | Output Filename |
openssl x509 -req -days 365 -in reservopiacsr.pem -signkey reservopia-key.pem -out reservopia-certificate.pem

Install – SSL Certificate
Next step, after creating the certificate, you have to install it on the ELB HTTPS Listener port.Alternatively, you can also perform the certificate installation via AWS CLI.
Configure Listener
Click on the “Load Balancers” and choose the Load Balancer Name where in you intend to install the created SSL certificate. Then click on “Listeners” tab and click on “Edit” button.
Edit Listener
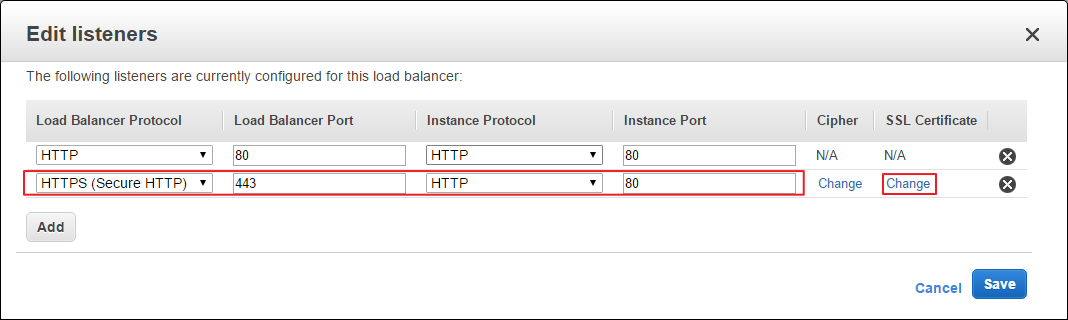
Next step is to add the listener to add a new listener, click on “Add” button to add a new listener, configure listener according to the below table and click on “Change” option;| Listener Description | Option |
| Load Balancer Protocol | HTTPS (Secure HTTP) |
| Load Balancer Port | 443 |
| Instance Port | 80 |
| Cipher | N/A (Not Configured) |
| SSL Certificate | Change |
Select Certificate
Next step is to choose “Certificate Type”, since we are deploying the certificate for testing environment, choose the option “Upload a new SSL certificate to AWS Identity and Access Management (IAM)”.
Configure Certificate Information
Next step is to configure the certificate information in the respective fields; Open the respective files in a notepad, copy the contents of the file and paste it into the appropriate fields and click on “Save” button.| Certificate Filed | Information |
| Certificate Name:* | Customizable or set it as Application Name |
| Private Key:* | RSA Key file contents “reservopia-key.pem” |
| Public Key Certificate:* | Public Key file contents “reservopia-certificate.pem”. |
| Certificate Chain: | Optional |

Create Listener
After validating the certificate, certificate will be install on the Elastic Load Balancer and the listener is created automatically.
Create – ELB Security Group
After installing the certificate on ELB, next step is to secure the servers. In order to secure the environment we will create a new security group for ELB for communicating between the application servers for http and https access only.Create Security Group
In order to create a new security group click on “Security Groups” and click on “Create Security Group”; Set security group name, description and most important choose the VPC wherein the ELB has been configured.Add “Inbound” rules for http and https and source as anywhere and then click on “Create” button.

Configure Security
After configuring the inbound rules on the ELB security group, click on “Security” tab of the ELB and then click on“Edit” button.
ELB Security Group
Next step is to choose the security group that has been configured for “ELB” and click on “Save” button.
Configure App Security Group
In order to secure the application servers, we will configure inbound rules of application security group such that communication between ELB and application servers only is permitted.
Validate App Server Inbound Rules
After saving, validate the configured inbound rules and ensure the name of the “ELB Security group” in the source.
Configure Stickiness
Stickiness is one of the most important configuration when the application does not know as to how to handle sessions more than one server in a pool of servers, since the request would be sent in a round robin method unless stickiness is enabled.Enable Stickiness
By default stickiness is disabled. To enable it click on “Edit” link.
Enable LB Cookies
In order to stickiness, cookie information has to be coupled with network packet; if application is able not able to session replication choose the option “Enable Load Balancer Generated Cookie Stickiness” option and leave blank “Expiration Period” and then click on “Save” button.
LB Stickiness Status
After saving, current stickiness configured will be displayed in the ELB description tab.
tfksilent, this is copied from my website...
ReplyDelete